-
If you get your hands too hot while cooking outdoors,
Prioritize Heat Protection & Material Heat-Resistant Leather (Cowhide/Goatskin): Best for direct flame/ember contact (e.g., adjusting logs, handling grill grates). Offers excellent protection but limited dexterity. Look for thicker leather (12-16 oz) for serious fire management. Silicone-Coated Fabrics (Nomex/Kevlar): Great for general grilling/smoking. Silicone provides grip on hot, greasy handles. Offers good heat resistance (often 500°F+/260°C+) […]
June 24, 20251023 Views
-
Best Gardening Gloves, According to Testing
Many gardeners enjoy getting their hands dirty as they garden—but unfortunately, danger can lurk in the soil. (Think animal fecal matter and organisms, not to mention poison ivy and other undesirable plants.) Garden gloves are a great way to protect yourself from thorns, brambles, and scratchy plants—and keep your hands cleaner, too. “Gardening gloves are […]
August 15, 20231977 Views
-
Oven Cleaning
We’ve got the oven on our minds today as we tackle Spring Cleaning in our kitchens. If you’re like me, it’s easy to spill in the oven, I make a big mess and a horrible smell, and then I close the door and forget all about it until the next time I turn on the […]
August 3, 20232085 Views
-
Flank Steak with Chimichurri
This chimichurri steak recipe starts with a juicy citrus marinated flank steak grilled to perfection, then sliced into strips, and served with cilantro chimichurri sauce! The cilantro chimichurri adds the perfect zippy flavor to this tender flank steak. Pin this Recipe for Later We absolutely love steak in this house, especially when it’s taken a […]
August 1, 20232080 Views
-
HEALTHIER PUMPKIN CHOCOLATE CHIP GIANTS
Hold on to your hats, people! I actually captured a photograph of something edible. Something delicious. Something for YOU! You guys, I have to confess that I have been mentally opposed to #pumpkiningallthethings this season. It could be because I took a beach vacation at the end of September, or maybe because the food industry has really […]
July 31, 20232095 Views
-
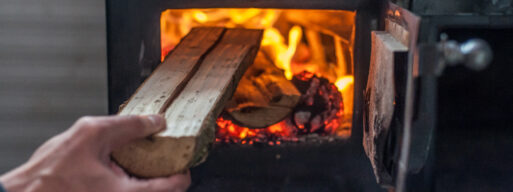
How to Make the Most of Fireplace Season
Did you know that over 25% of Canadian homes have gas fireplaces? And that’s not to mention the number of wood-burning fireplaces in homes across the country. Winter is upon us, which means fireplace season is, too. Yet, though most Canadian homes have one or more fireplaces, many of us do not know how to use them […]
July 27, 20233078 Views
-

Tips For Moving With Pets
Relocating across the country is exciting but can also be stressful, especially when you’re doing it with your furry family members. Pets become accustomed to routines and places they know, so moving to a new location can be disorienting and anxiety-provoking. The good news is with some planning and preparation, you can make the transition […]
July 26, 20232273 Views
-
A New Rose Garden at My Farm
One thing I love is the intoxicating scent of a garden rose – especially an English rose. Earlier this year, I designed a new garden behind my main greenhouse not far from my raspberry bushes. This space had previously been used for planting dahlias, but I decided it would be an excellent area for planting […]
July 25, 20231311 Views
-

How to Start a Rose Garden
Most rose books recommend a 2-foot planting hole for each rose bush, but that’s not a directive that works everywhere. Where I am in Georgia and where Paul is in South Carolina, we have red clay. As Paul says, digging a 2-foot hole requires small explosives. Paul preaches a whole-bed approach. “Prepare your entire bed,” […]
July 24, 2023936 Views
-

GARDEN AT HEATHER FARMS WEDDING // WALNUT CREEK WEDDING PHOTOGRAPHER
It was a warm afternoon in Walnut Creek. Friends and family gathered from near and far at the Gardens at Heather Farm to celebrate Eve and Weihan’s wedding as well as their final days as residents of California. Surrounded by loved ones in a beautiful rose garden in full bloom under the warm California sunshine, […]
July 22, 2023901 Views